Introduction
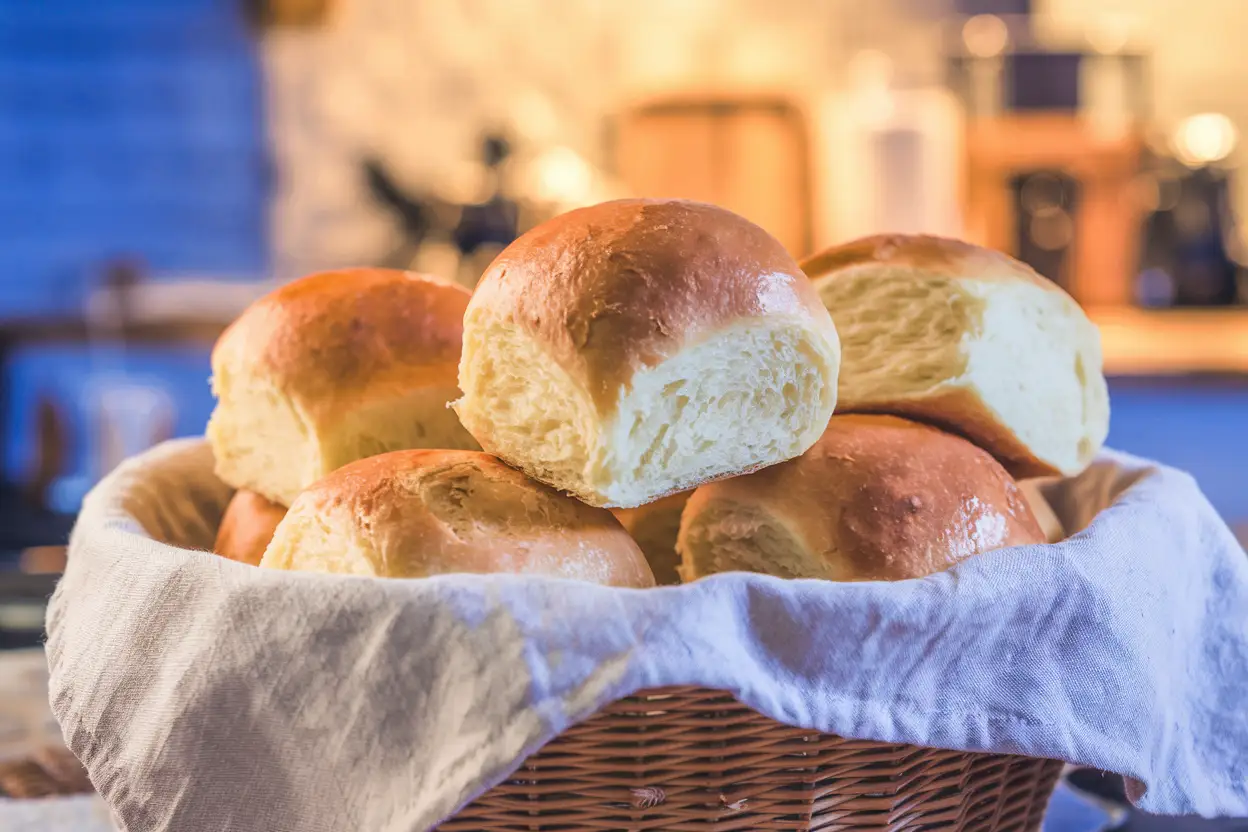
The warm, inviting aroma of freshly baked bread instantly fills the kitchen, creating a sense of comfort and anticipation. It fills the kitchen with warmth and anticipation, making every meal feel extra special. As someone who loves homemade baking but also appreciates convenience, brown and serve rolls have become a staple in my kitchen. They offer the best of both worlds—the comfort of homemade bread with the flexibility of preparing them ahead of time.
I remember the first time I made these rolls from scratch. I wanted that soft, buttery texture of dinner rolls but without the last-minute hassle of kneading and proofing while juggling other dishes. That’s when I discovered the beauty of par-baking. By partially baking the rolls in advance, I could freeze them and simply finish baking whenever I needed fresh, warm bread on the table.
Whether you’re planning for a holiday meal, a family gathering, or just a cozy dinner, this recipe ensures you’ll always have bakery-quality rolls at a moment’s notice. Let’s dive into the process of making these delicious brown and serve rolls from scratch!
What You’ll Need
Before diving into the recipe, gathering the right tools and ingredients will make the process much smoother. Here’s what you’ll need to make brown and serve rolls effortlessly.
Essential Equipment
- Stand mixer with dough hook attachment – Helps knead the dough evenly.
- Mixing bowls – Used for blending ingredients and allowing the dough to rise.
- Measuring cups and spoons – Essential for precise ingredient measurements.
- Baking sheet – Used for both par-baking and final baking.
- Parchment paper – Keeps dough from sticking and promotes even baking.
- Kitchen thermometer – Helps check the milk temperature for activating yeast.
- Plastic wrap – Covers the dough while rising to prevent drying out.
With these tools ready, you’ll find the baking process much more enjoyable and hassle-free!
Ingredients
For these brown and serve rolls, you’ll need simple pantry staples that come together to create soft, fluffy rolls with a buttery taste.
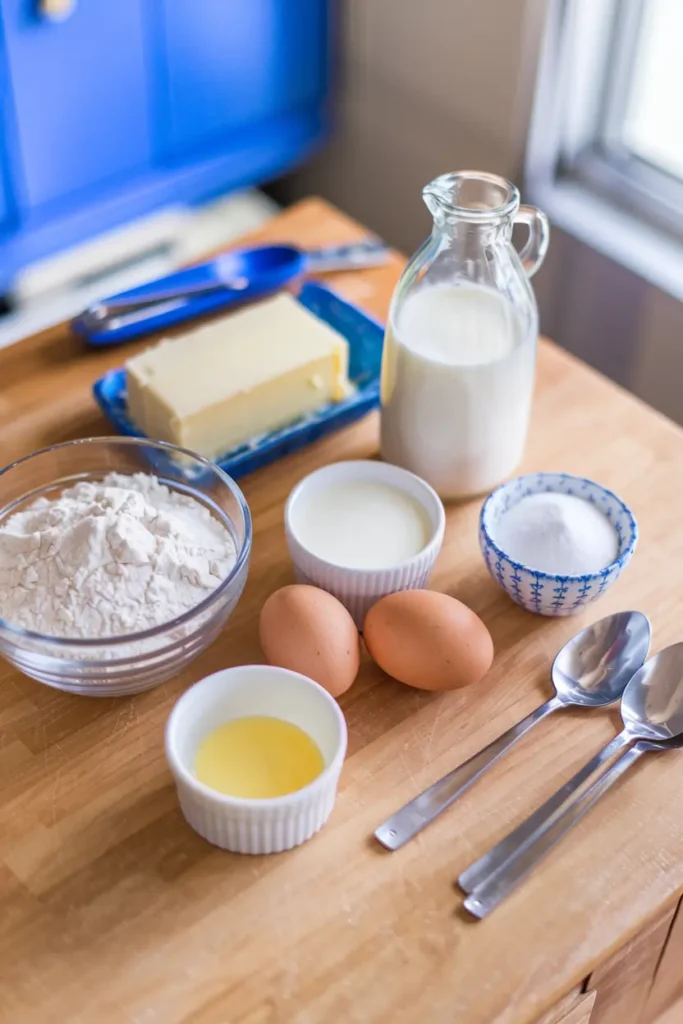
- 3 cups all-purpose flour – Provides the structure for the rolls.
- 1 cup whole milk (warmed to 100°F) – Adds richness and helps activate the yeast.
- 1/3 cup granulated sugar – Feeds the yeast and gives the rolls a subtle sweetness.
- 2 large egg yolks – Enhances texture and gives a golden color.
- 1 tablespoon + 1 teaspoon active dry yeast – The key leavening agent for fluffy rolls.
- 2 ½ teaspoons kosher salt – Enhances flavor and balances sweetness.
- 8 tablespoons unsalted butter (softened) – Adds moisture, tenderness, and a rich taste.
Ingredient Notes & Substitutions
- Flour Options – You can substitute up to 50% whole wheat flour for a heartier texture.
- Milk Alternatives – For a dairy-free version, use almond or oat milk instead of whole milk.
- Extra Flavor Boost – Add chopped herbs or garlic powder to the dough for a savory twist.
With these ingredients prepped, you’re ready to start making your homemade brown and serve rolls!
Instructions
Making brown and serve rolls is a two-step baking process—first, the rolls are partially baked, then stored until they’re ready for the final golden finish. Follow these steps for soft, fluffy, and delicious homemade rolls.
1. Activate the Yeast
- In a small bowl, combine warm milk (100°F), sugar, and yeast.
- Stir gently and let it sit for 5-10 minutes until frothy. This step ensures the yeast is active. If you’re new to working with fresh yeast, check out this step-by-step guide on activating fresh yeast for additional tips.
2. Prepare the Dough
- In the bowl of a stand mixer, add flour, egg yolks, and salt.
- Pour in the activated yeast mixture and mix on low speed for 5 minutes until combined.
- Let the dough rest for 15 minutes to allow the flour to absorb moisture.
3. Incorporate Butter & Knead
- Switch to the dough hook attachment and add half of the softened butter.
- Start mixing on low for 30 seconds, then gradually increase to medium speed.
- Continue kneading for 5-8 minutes, until the dough pulls away from the bowl and becomes smooth.
4. First Rise
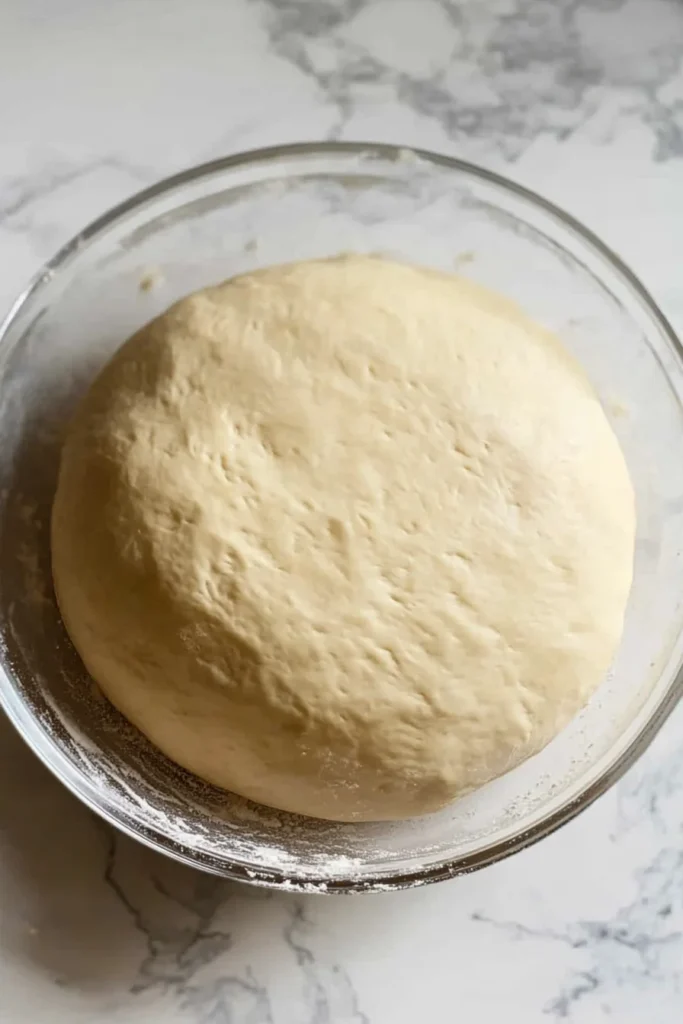
- Form the dough into a round shape and set it in a lightly oiled bowl.
- Cover with plastic wrap and let it rise in a warm place until doubled in size (about 1 hour).
5. Shape the Rolls
- Punch down the risen dough and divide it into 14 equal portions (about 2 ounces each).
- Shape each portion into a smooth ball and arrange them on a baking sheet lined with parchment paper.
6. Second Rise
- Cover the shaped rolls with plastic wrap and let them rise again for 30-45 minutes, until puffy.
7. Par-Bake the Rolls
- Preheat the oven to 275°F (135°C).
- Melt the remaining butter and brush it over the rolls.
- Bake for 25 minutes, until the rolls are firm but still pale—they should not brown yet.
8. Cool & Store
- Let the rolls cool on a wire rack for 10 minutes.
- Wrap them tightly in plastic wrap and store in a freezer-safe bag for up to 3 months.
9. Final Bake (When Ready to Serve)
- Preheat the oven to 400°F (200°C).
- Place frozen rolls on a parchment-lined baking sheet.
- Bake for 10-12 minutes, or until they turn golden brown and are heated through.
Note: Baking times may vary slightly depending on your oven, so always check for a golden-brown finish!
Tips & Hacks
Want to make your brown and serve rolls even better? Here are some helpful tips and tricks to ensure they turn out perfectly every time.
1. Make-Ahead Convenience
- These rolls are perfect for meal prep! Par-bake and freeze them so you can have fresh rolls ready in minutes whenever you need them.
2. Get a Golden Crust
- For extra color and flavor, brush the rolls with melted butter before the final bake.
- Want a slight crunch? Sprinkle sea salt or sesame seeds on top before baking. For an extra burst of flavor, pair your warm, buttery rolls with this garlic cilantro sauce—a zesty dip that adds a refreshing contrast to the rich, golden crust.
3. Flavor Enhancements
- Herb-Infused Rolls – Mix chopped rosemary, thyme, or chives into the dough for a savory twist.
- Garlic Butter Rolls – Brush with garlic-infused butter before the final bake.
- Cheese-Stuffed Rolls – Place a small cheese cube inside each dough ball for a gooey surprise.
4. Ensuring Soft & Fluffy Rolls
- Use fresh yeast to guarantee a good rise. If your yeast mixture doesn’t foam, start over with a new batch.
- Don’t over-knead—too much kneading can make the rolls dense instead of soft.
- Let the dough rise fully before baking. Rushing this step can lead to smaller, tougher rolls.
By following these tips, you’ll get the most flavorful, bakery-quality brown and serve rolls every time!
Nutrition Score
Each brown and serve roll contains approximately:
- Calories: 150
- Carbohydrates: 22g
- Protein: 4g
- Fat: 5g
- Fiber: 1g
- Sodium: 180mg
Nutritional Benefits
- Balanced Energy – The combination of carbs, fats, and protein makes these rolls a great side dish to complement any meal.
- Rich in Flavor – Thanks to butter and egg yolks, these rolls have a soft, rich texture without being overly heavy.
- Customizable for Healthier Options – Substitute whole wheat flour for extra fiber or use reduced-sodium salt for a lower-sodium version.
Note: These values are estimates and may vary depending on ingredient brands and portion sizes.
Frequently Asked Questions
1. Do brown and serve rolls need to be baked?
Yes! Brown and serve rolls are partially baked during preparation, meaning they need a final baking session before serving. This ensures they develop a golden-brown crust and are warmed through.
2. Who made the original brown and serve rolls?
The concept of brown and serve rolls was reportedly invented in 1949 in Avon Park, Florida, by a local baker who discovered that partially baking rolls allowed them to be stored and finished later, providing convenience without sacrificing freshness.
3. Does Kroger sell brown and serve rolls?
Yes, Kroger typically carries brown and serve rolls, especially during the holiday season. Availability may vary depending on the location, so it’s best to check your local store or Kroger’s online inventory.
4. How to heat up brown and serve rolls?
To heat brown and serve rolls, follow these simple steps:
- Preheat your oven to 400°F (200°C).
- Place the rolls on a parchment-lined baking sheet.
- Bake for 10-12 minutes, or until they turn golden brown and crispy on the outside.
For an extra buttery flavor, brush with melted butter before serving!
Print
Brown and serve rolls
- Total Time: 2 hours 30 minutes (including rising and baking time)
- Yield: Makes 14 rolls 1x
- Diet: Vegetarian
Description
These soft, buttery brown and serve rolls offer homemade flavor with the convenience of prepping ahead. Par-baked and frozen, they can be finished in minutes for fresh, warm bread anytime—perfect for holidays or busy weeknights!
Ingredients
- 3 cups all-purpose flour
- 1 cup whole milk, warmed to 100°F
- 1/3 cup granulated sugar
- 2 large egg yolks
- 1 tablespoon + 1 teaspoon active dry yeast
- 2 ½ teaspoons kosher salt
- 8 tablespoons unsalted butter, softened
Instructions
- Activate the Yeast: In a small bowl, combine warm milk, sugar, and yeast. Stir and let sit for 5-10 minutes until frothy.
- Prepare the Dough: In a stand mixer, combine flour, egg yolks, and salt. Pour in the activated yeast mixture and mix on low speed for 5 minutes. Let the dough rest for 15 minutes.
- Incorporate Butter & Knead: Add half of the softened butter to the dough. Mix on low for 30 seconds, then knead on medium speed for 5-8 minutes until the dough is smooth and pulls away from the bowl.
- First Rise: Transfer the dough to a lightly oiled bowl, cover with plastic wrap, and let rise in a warm place until doubled in size (about 1 hour).
- Shape the Rolls: Punch down the dough and divide into 14 equal portions (about 2 ounces each). Shape into smooth balls and arrange on a parchment-lined baking sheet.
- Second Rise: Cover the shaped rolls and let rise for 30-45 minutes until puffy.
- Par-Bake the Rolls: Preheat oven to 275°F (135°C). Brush rolls with melted butter and bake for 25 minutes, until firm but pale.
- Cool & Store: Let rolls cool for 10 minutes. Wrap tightly and freeze for up to 3 months.
- Final Bake: When ready to serve, preheat oven to 400°F (200°C). Place frozen rolls on a baking sheet and bake for 10-12 minutes until golden brown.
Notes
For extra flavor, add herbs or garlic powder to the dough.
Brush with melted butter before the final bake for a golden crust.
Store par-baked rolls in an airtight bag to prevent freezer burn.
- Category: Bread
- Method: Baking
- Cuisine: American
Nutrition
- Serving Size: Per Roll
- Calories: 150
- Sodium: 180mg
- Fat: 5g
- Carbohydrates: 22g
- Fiber: 1g
- Protein: 4g
Keywords: brown and serve rolls, homemade dinner rolls, make-ahead rolls, freezer-friendly bread, soft butter rolls
Conclusion
Baking homemade brown and serve rolls is a simple yet rewarding process that combines the joy of fresh bread with the convenience of make-ahead preparation. By following this recipe, you can enjoy soft, fluffy rolls that are always ready to be finished and served warm whenever you need them.
Whether you’re preparing for a holiday feast, a family gathering, or just want fresh rolls with dinner, this method ensures you’ll never be without bakery-quality bread at home. The best part? You can customize them with herbs, garlic butter, or even a cheesy filling to make them your own.
Now it’s time to get baking! Try this recipe and experience the magic of homemade brown and serve rolls—your future self will thank you when all you have to do is pop them in the oven and enjoy!